Showing posts with label tutorial. Show all posts

Finding Alternatives

16 February 2016


I try to be a mindful food shopper, only buying what we need to prevent food waste but it is really hard to completely reduce the packaging food is wrapped in.  Everything comes packaged in materials, sometimes excessively so, but then there are many foods that it wouldn't be terribly practical to transport without some form of packaging.  It is all a bit of minefield but it is all too easy to think, oh that can be recycled I am not convinced that that it is a valid argument at all times.  It can make us lazy.

I stopped buying cling film a long time ago.  I didn't like the idea of wrapping my food in plastic and, it seemed very wasteful.  It is not easy to reuse, by its very nature it sticks to itself, so neither washing it or storing it between uses is remotely practical.  But what to use instead.  Cling film performs many jobs, amongst which it stops food drying out, I have been struggling with this since stopping buying it.  Nothing I used to cover bread rising or dough resting was quite the same.  It was whilst looking for inspiration for Christmas presents that I found my solution, beeswax coated cloth.   You can buy these from a few places online but my inspiration came from a craft book found in the library, a how to make your own.  Perfect!

It was January before I had a chance to give it a try.  I collected together the materials I needed.  A grater, paintbrush, beeswax, fabric and pinking shears.  Everything I read suggested having a separate grater for this job, one that will never grate food.  We already had one as we grate blocks of soap to make our own liquid soap.  The paintbrush is washable in boiling water if you don't want to go out and buy an extra one, although again I read suggestions to have a designated one.  The beeswax I bought took me into a whole new world of language.  When I looked in to what I needed I discovered that not all beeswax is 100% natural, that some is food grade, some cosmetic grade, some is really hard to grate.  It seemed like a bit of a minefield but I wanted to buy as local as possible, I get my candles from a local candlemaker but he didn't use his own beeswax to make them and suggested I contacted his supplier, who was also local.  Personal recommendations are always the best aren't they, it led me to exactly what I needed, a block of beeswax that was easy to grate and had no hidden added extra ingredients.  It smelt wonderful too. The fabric was the easy bit, it needed to be light and 100% cotton I have plenty of that.  The pinking shears are to cut it to prevent fraying so there is no need for any sewing.

So what do you do?  Grate the beeswax.  Cut the fabric to size.  Put the oven on a low heat (I found 30°C just right).  Put the fabric on a baking tray (you might want to line it with something to stop the wax melting onto it).  Sprinkle the beeswax over the fabric as evenly as possible as if you were making cheese on toast.  Place in the oven.  Check often and when the wax is just beginning to melt and soften remove from the oven and spread the wax all over the fabric with the paintbrush (you can check on the reverse to see if it is evenly spread).  Hang up to cool and dry.  As easy as that.

If you don't spread the wax around with the paintbrush you will find that you get small pools of melted wax with gaps in between.  Don't worry if this happens just sprinkle some more wax and return to the oven.  It is better to start with less wax rather than more, you can always keep addding!  I made a small test one first and then tried some bigger pieces.  I cut them to fit the dishes and bowls that I wanted to be able to cover.  If, like me, you find that they are bigger than your oven just coat half of the fabric at a time, carefully draping the rest of the fabric out the way.  This is when you realise that you should have really cleaned the oven a little better before starting.........

I have only been using mine for a few weeks and they are wearing well.  I am told that you can recoat them, time will tell.  I made a set for a friend which were really well received (they are the fabrics in the photo).  They must only be washed with cold water and a mild soap to clean so are not suitable for storing meat.  They can be molded, just by the warmth of your hands, to fit any shape of dish or food.  They are not suitable for food containing a lot of moisture.  Making your own not only works out a lot cheaper but you get to choose whatever fabric you like.  I love them!

********************

I will be back on Saturday to share more of what I have been up to in my kitchen this month.  You can join me if you want to share what you have making and eating this month. 


Trousers

18 February 2015

I have had an old pair of my trousers languishing for some time in a drawer waiting for me to do something with them.  I mentioned this drawer last month.  They were worn out completely on the seat but the material everywhere else was fine, I was loathe to throw them away.  They came to may attention again when I was hunting for the trousers to make the coasters I posted about recently.  I wondered if I could make a pair of trousers for Alice*, not being a sewer who follows patterns I made it up as I went along.

First up I laid a pair of her trousers on top of mine and cut straight across the fabric two and half inches above the top of the waist line of the smaller pair.  The two and half inches is the allowance I made for the waistband.  This gave me two tubes of fabric.


I then measured from the crutch to the bottom hem on Alice's trousers, measured this on one of the tubes and turning it inside out cut the seam from the top to that point, repeat for the other leg/tube.


Turn one leg/tube the right way out and insert this tube inside the one that is still inside out and pin round the seams that you have just cut (they should be right sides together) and sew.


Then I created a waistline.  Unfortunately my two and half inch allowance had taken me into slightly into the crutch of the original trousers so I didn't have the two and half inches I needed for the waistband.  As these trousers are going to worn for messy outside play in winter I wasn't too precious about how they looked.  Ideally I would have liked to have folded (wrong sides together) a half inch first and then a further inch to create a neatly seamed tube for the elastic to be inserted into.  I just folded the material over and sewed a seam to give me a one inch tube into which I inserted the elastic.


The important thing is that they fit!  An easy pair of trousers.

I have been sewing up a storm this week as I finished off the coasters that I had waiting patiently in a pile, I now have six and I sewed up another skirt for Alice using this lovely tutorial.

_________________________


* I have decided to give my children names on this blog rather than youngest and eldest, these are not their given names.  My eldest henceforth will be Cameron.


Repurposing

21 January 2015


I have an old chest of drawers that used to belong to my granparents, it has deep wide drawers which are hopeless for keeping clothes in.  You always want/need what is at the bottom back corner.  We I use it for storage.  The top drawer is full of first aid supplies, a hangover from my time as an outdoor instructor I never go anywhere without a first aid kit which needs constantly resupplying..................

Of the other two drawers one has yarn it, mostly ends of balls from past projects and a few skeins patiently waiting to be knitted.  The other is full of material, again pieces left from projects, or pieces acquired/given to me that have already been made into something but would be perfect to be made into something else someday.  There is also a small pile of old clothes beyond repair that are, the could be used to make something one day pile.  One piece is a pair of old linen trousers of mine worn for years but now completely worn through on the seat and rather grubby I noticed when I got them out to have a good look at them recently.

I have been wanting to make some mats to put hot drinks on for a while now, we have a few round cork ones that look like a mouse has had a good chew at, they haven't I don't think but I wouldn't put it past those mice that moved in a couple of years ago.  We also have a few old CDs that do a serviceable job but they have a hole in the middle which means that a small part of the surface they are on still gets hot, one of our tables does not like this.  So I had some linen and an idea and this is what I came up with................


I had no template and so kind of guessed based on the one square mat we own.  They have a section of towel in the middle to provide the padding.  The towel is an old stained one that had been relegated to the mopping up messes pile.  As the linen was a pale colour I thought they would look good with an appliquéd shape on them, I went for an apple but you could sew anything you fancy, a circle, a leaf, maybe?  If you don't fancy applique you could just miss that part out and make them from some patterned material.


So I cut two squares, from the linen and one from the towel. The first two I made were 4" squares, the third a 5" square.  I sewed the appliqué shape to one of the linen squares.  Then I placed the linen squares right sides together with the towel square on top, pinned them and sewed around 7/8ths of the edges leaving a 1/8 of a side unsewn.  I turned it the right way out through the hole and hand sewed the edge up.  Voila a mat.  I now have three, in three different sizes it would seem.............


I have cut some squares to make some more they are patiently waiting on a shelf.

Strawberries

05 August 2014


I love strawberries, do you?  They are my favourite summer fruit picked and eaten straight from the bush or in a bowl with a splash of cream, yum!  We have lots of wild strawberries growing in our garden they are the only type I have been able to grow successfully, from seeds kindly delivered by the birds, so any others have to be bought and we usually stock up each year at the local pick your own and make some jam, of course!

I haven't made anything for our seasonal table in ages, we started this at the beginning of last year when we were given a beautiful driftwood tree which I thought would make a great centrepiece.  Over the past eighteen months I have made a few pieces each season to slowly build a collection.  So when I saw these on a recent crafting link up I knew I had to add strawberries to my table.  I found a pattern and some red and green wool and went to cast on but then I remembered about some peg dolls I had bought and that I was going to make strawberry people with them when the summer came round, a much better project as I could include the children.


These were incredibly easy to make.  I used two sizes, 4cm and 6cm as that it what I had to hand, but you could use any.  We painted the body and part of the head, leaving a part unpainted for the face, with red acrylic paint.  We drew the eyes and mouth on with these, and cut a small piece of green felt for the calyx, which was glued on with a glue gun.  The achene (those are the green seed like looking pieces which are not seeds at all) were drawn on with the same pens as the eyes and mouth.  It was impossible to get the light green shading, perhaps if we had had some light green paint it might have worked?


There you have it, a family of strawberry peg people.......


You can see some other makes in this last picture including Mother Earth, watching over the little strawberries, and some flowers knitted up using patterns from this book.

Dress Tutorial

03 June 2014

I recently made a dress which I devised a pattern for using a dress that I knew fitted.  As I made up the pattern I had no sewing instructions to follow and had to make them up as I went along.  I decided that in case I wanted to make another one, which I probably will, I was best off taking pictures as I went to remember what I did.  So here they are, a tutorial with pictures of a lined shift dress with an invisible zip.

This dress was made from two different pieces of material for the front and back if you are using one you can skip this stage.  Pin the outer material pieces right sides together and sew.


Pin the shoulders right sides together on both the outer material and the lining and sew together (independently).  Outer to outer and lining to lining.


Pin the outer material to the lining around the neckline with the right sides facing and sew.


Cut the material down to your stitching, taking care not to cut through your stitches, in slits about 1cm apart all the way round the neckline.  This will enable the neck to sit flat without bunching.


This is what it should look like on the right side:


Next up is the zip, pin this to the outer fabric so that the right sides are together, and tack (sew some temporary stitches).  Lay the right side of the lining over the top and do the same. If you want to check you have got the right side of the material and the zip turn everything the right way out at this point to check. Then machine sew using a zip foot, if you have got one.  I had to look this up to find out what it looked like!


Now for the other side of the zip.  I have turned the side I have just sewn to right side facing the part I need to sew the zip to and pinned and tacked as before.  Then repeat with the lining and machine sew the zip in.  Again check before you machine sew that you have everything the right way round.


It should look like this when you have finished sewing:


Now for the armholes.  Lay the dress on the table with the right side facing down and the lining uppermost.


Roll the edge nearest to you away from you:


Reach underneath and bring on top the outer fabric that is not rolled up, the armhole edge of the lining is uppermost in this picture the outer fabric is at the bottom:


Fold the outer fabric over onto the lining so that the right sides are together and your roll of fabric is in the middle.  Pin and sew, take care when sewing to ensure that you don't end up sewing the fabric rolled up inside.  I failed to take a picture of this bit but the picture below shows the armhole sewn and cut as per the neck piece to prevent bunching of fabric.  The armhole is at the bottom of this picture:


Now for the magic bit, reach inside your tube and gently pull the fabric out until you have everything the right way out.  It took me ages to work out how to sew the armholes and the ta dah moment when it looked like this was amazing.  I had a very wide smile at that point!


When you have sewn both the armholes turn the whole dress inside out and pin the outer fabric and lining as one long seam:


Sew both sides up, hem as desired and your dress is complete:


Joining in with Nicole for sharing of making and creating, head on over to see what others have been up to.

Elephants

27 May 2014

A couple of weeks ago I shared some material that I intended to make into a dress for my daughter.  I had already tried to make one dress which sadly ended rather badly with a half finished item that doesn't fit and is beyond my sewing skills to rescue.  I am hoping my mum can help when she visits later this week.  I didn't want to try another bought pattern but I had read about using an existing garment to create a 'pattern' of your own in this lovely book, so I thought I would give that a go.

The first step is to draw around the item, this dress is a simple sleeveless tunic style dress with a zip up the back, onto the pattern paper.  I am sure you can buy expensive paper which is designed for that job, I used greaseproof/baking paper from my kitchen drawer!

You will need to examine the garment carefully to work out how many pieces it has.  This dress has three a front piece and two back pieces.  The back pieces are identical so I only needed one pattern piece, I also decided to draw the front piece in half and fold the material in half to cut it.

Lay the garment, it's a good idea to iron it first, on the paper and carefully draw round it with a dark pencil.  The neckline on this garment was lower at the front than the back.


To get the shape for the front piece you can either draw it freehand or, as I did, use a small piece of paper inserted into the dress to get the shape, which I then transferred to the pattern piece.


Once you have drawn round the garment remove it from the paper you now need to add your seam allowances.  I added 1.5cm.  I used a ruler to mark in dashes and then joined them together.


The original garment is all once piece on the front and back but I wanted to divide them in two.  I worked out where I wanted the seam to run across the front and back and drew that onto the pattern and then added a seam allowance for each piece.


I could have cut these out as separate pieces but I decided to just fold the pattern pieces on the lines to cut the material.  I made this dress fully lined.

I had no pattern to follow when it came to sewing it up.  I managed to work out how to sew in an invisible zip and sleeves without hand sewing and will share how I did this another week otherwise this post will get a bit long and I need to go and make some food for my daughter's birthday party this afternoon.  I will leave you with pictures of the finished article, my daughter loves it and has worn it for the last two days!


Joining in with Nicole........head on over to see what others have been making.


Owls

15 April 2014

I try and make most of the presents that we gift, especially to children.  There is something special about the process of thinking about and making the right present, even if it is something you make time and again there are little tweaks you can make to individualise it to the recipient.  I was given a lovely book for my birthday last year which has inspired us to make a few bits and pieces for our seasonal table.  The back section of the book is given over to stories and whilst I wasn't inspired to make any suggested by the book I started to think of stories that I knew that would lend themselves to be being added to in this way to make a small storysack.

One of my all time favourite stories for young children is Owl Babies by Martin Waddell, I have reviewed it here.  I bought a copy for my eldest when he was very young and have been reading it to him and then to my youngest ever since.  There are some books that I find tedious to read time and time again, but not this one.  The text also lends itself to being read by those learning to read, it is slightly repetitive and the words are simple.  It will be a sad day for me when my children no longer want to hear this charming story.  It has four characters mother owl and her three babies, this book is perfect for a story sack.


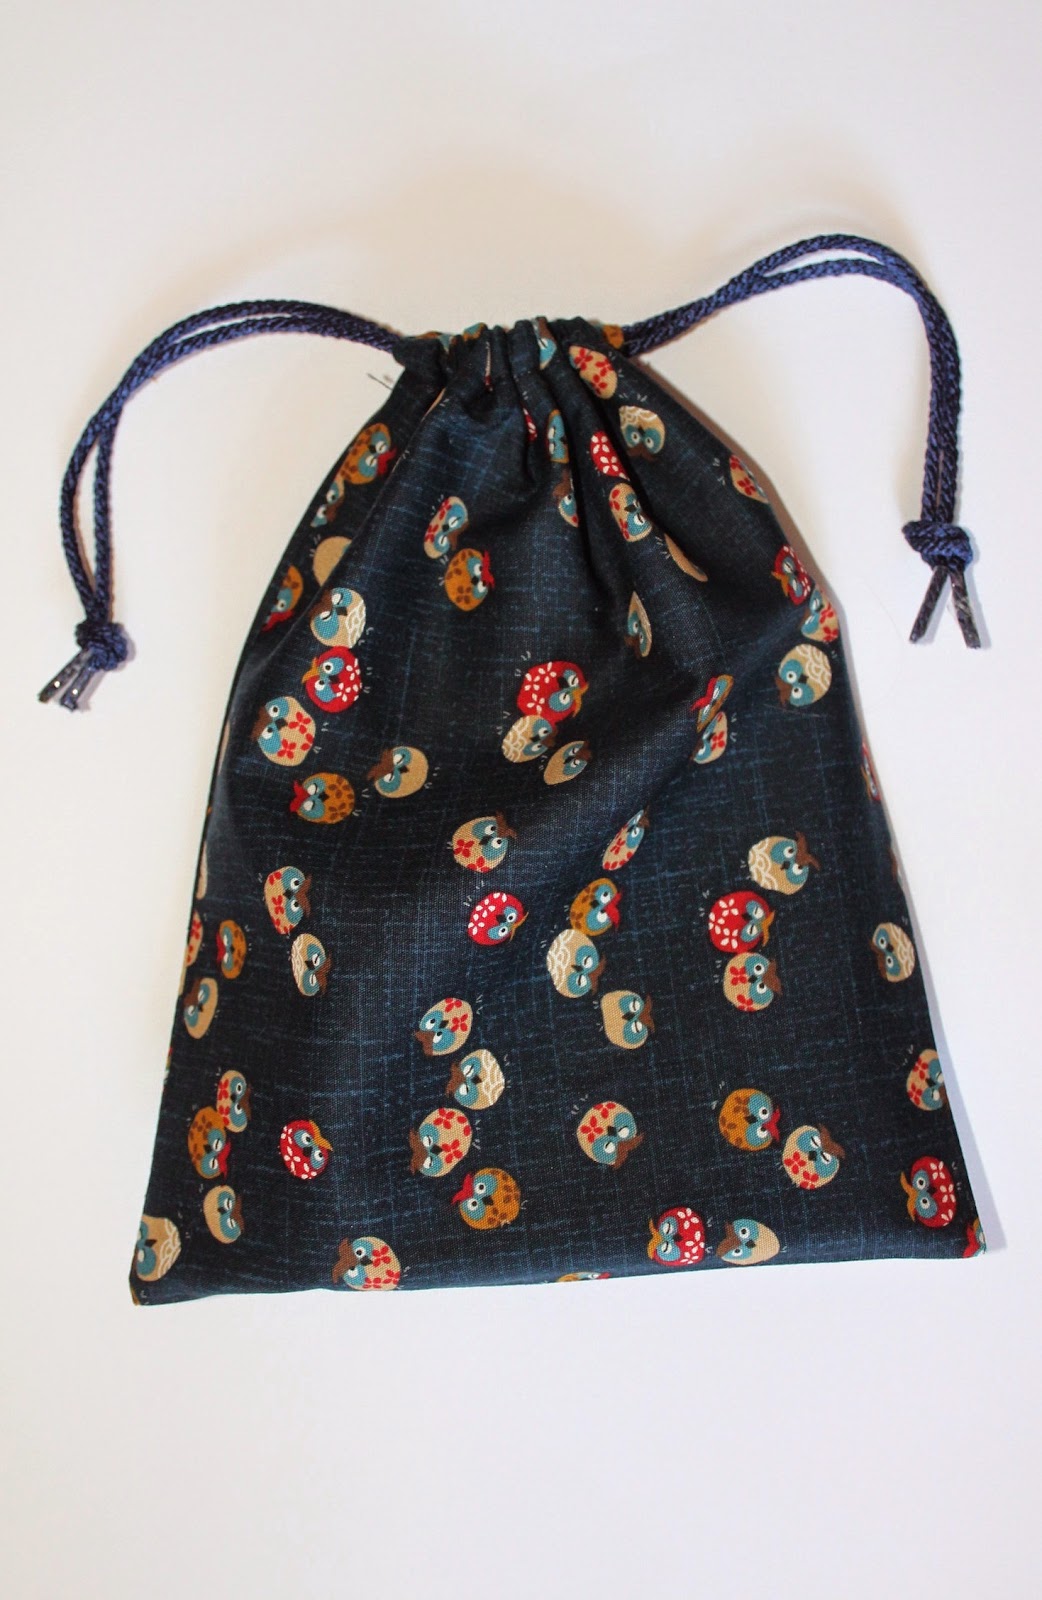
I used little peg dolls to make the Owls, a 6cm for the Mother Owl and 4cm for the babies both rounded in shape.  I bought my peg dolls from here.  I painted them with opaque paints, non toxic in case they are put into little mouths.  The wings and the head/beak on Mother Owl are small pieces of wool felt, glued in place.


The little bag, to keep all the pieces together, has owls on it too, of course! I made the bag in a simple construction with a drawstring top.  If you cut a piece of material to the size you need.  Turn the side edges, at the tops, in by a cm for about 5cm, turn the top edges over by about 1/2cm and pin, now turn the top edge over to create a tube for your cord, I turned over 2 1/2cm.  Pin and sew a seam on both ends of your fabric.  As close to this tube as you can cut the fabric so that the sides will sit flat, pin and sew the side seams.  Iron the seam and turn the right side out.  Cut your cord into two, I had a metre for this bag which is a little on the short side, and thread each piece through both tubes and knot on each side.  To close the bag pull on the knots to draw the top together.


An Owl Babies Storysack........


.........now I just need to finish another present for his sibling, their birthdays are a day apart!

Joining in with Nicole for a sharing of making and creating, pop over to see what others have been up to.....


Inspirations

01 April 2014

Last week I pondered the art of pinning and bookmarking 'some day' projects.  Things you like the look of but never get round to actually making.  A few weeks ago I noticed something in the penultimate picture on this post of a blog I visit regularly.  It was not the subject of the post but it caught my eye, and I could think of several uses for it too.  Therein lies the issue for me, lots of lovely things to make but what on earth would I do with them or who would I gift them to too,  this fabric bucket was different.  I did a small amount of research before realising that having made a bag recently the construction was pretty similar, a lining, some handles and putting it all together I could make use of the pattern which is what I did.


You could make these any size to suit what you need to store in them or the size of the space they are going to stand in.  I have made two so far and have enough of the lining material to make two, possibly three, more.  It was great to use up some of the material I have in my very full drawer, I only needed to buy some interfacing which I used to give the bucket some stiffness.


To make your own you need to decide what height and width you want your bucket to be, the width will be the diameter of your circle, the base.  To work out the dimensions of your main piece you will need the circumference of your circle, remember your school maths?  The diameter x π will give you the circumference which is your width and the height you have already decided on.  The handles I cut 10cm wide and 22 cm long.  If you are using interfacing for a bit of stiffness then you will need two pieces your base circle and your main piece rectangle.

To make the handles fold the handles in half widthways and iron.  Open out and refold the edges to the middle, iron again.  Fold this in half, iron, pin and edge stitch.


Attach your interfacing to the wrong side of your two lining pieces, I used the iron on or fusible interfacing.  Pin, right sides together your main pieces for the outer and lining and sew.  Press the seams.  Pin the bases to the main pieces right sides together.  To make this easier I ironed creases into my base and side pieces by folding them in half and then into quarters, you can then use these marks to line the two pieces up.  When you sew the lining piece leave a gap about 15cm to enable you to turn the bucket the right way out.


Turn the lining right side out and pin the handles to the outside.  I used the creases that I had made earlier to line these up.  Put the lining inside the outer piece, which is wrong side out, so that you have right sides together.  Pin the pieces together, again using the creases to line them up.  Sew and press this seam.


Reach through the opening in the lining and carefully pull the bucket right side out.  Pin the gap in the lining together and stitch closed, and now you have a fabric bucket!


These are now storing our collection of small musical instruments and my yarny works in progress.  I have plans for more......


Joining in with Nicole over at Frontier Dreams for her weekly linkup of crafting, Keep Calm Craft On, head on over to see what others have been making......